增强的 VSCodeVim 使用体验
2024-03-29T01:47:24.000Z
本文具有强烈个人色彩,并不适用于所有人,但是欢迎在此配置的基础上进行自己的修改、完善和分叉
过去一年我通过 Vim 改善了自己的键盘输入习惯,并在浏览网页 (Vimium)、笔记记录(Obsidian)等场景中尝试运用 Vim 逻辑,效果显著。
但是,不得不说, Vim 是一个非常非常难上手的工具。Vim 精悍、可组合的哲学,减少了我对组合键的过度依赖(ctrl alt command options ...),但代价是 Vim 需要大量的前置知识 (建立新的肌肉记忆和记忆指令),同时配置 Vim 也占据我的很大一部分时间。
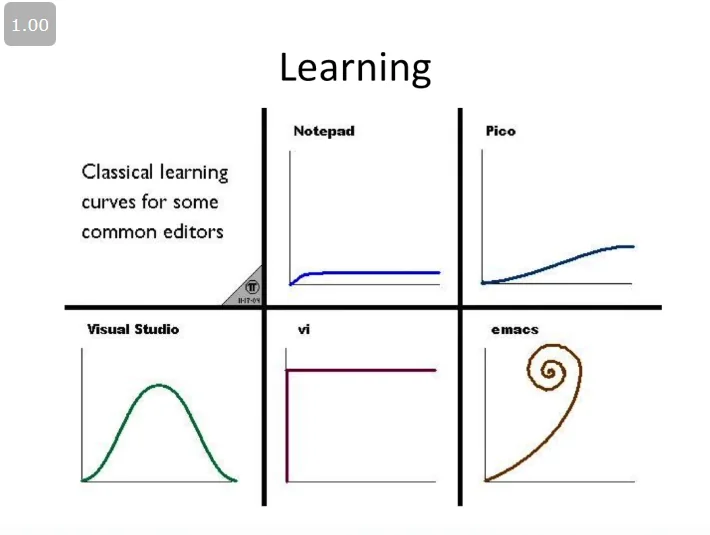
如图,Vim(Vi ) 的学习曲线实在过于陡峭,想要完全钻进 Vim 的世界,很难不耗费大量的时间和精力,尤其是在其他 IDE 越来越便捷的情况下,All in Vim 似乎不是一个十分有性价比的选择。
如果你希望获得类 Vim 的编辑体验 (只掌握有限且必要的 Vim 操作),又想要受益于 VSCode 开箱即用的插件生态,配置一个更加强大的 VSCodeVim 看起来是一个很不错的选择。
#准备工作
请根据需要安装如下 VSCode 插件:
- cuixiaorui.cvim
- yy0931.go-to-next-error
- antfu.smart-clicks
- devwright.vscode-terminal-capture
- Gruntfuggly.todo-tree
- mhutchie.git-graph
#光标移动
#跳转字符
安装 cvim 后,开启 flash 插件
// settings.json
{
  "vim.flash.enable": true
}
flash.nvim 相较于与其他光标跳转更加自然且符合自觉。cvim 在 VSCodeVim 的基础上实现了 flash.nvim 的功能并做了 体验优化
#跳转至错误
使用 go-to-next-error 插件的 go-to-next.xxx 命令可以快速定位至代码的 error、warning、info 等位置
// leader: next/prev error
[
  {
    "before": ["leader", "e"],
    "commands": ["go-to-next-error.next.error"]
  },
  {
    "before": ["leader", "E"],
    "commands": ["go-to-next-error.prev.error"]
  },
  // leader: next/prev warning
  {
    "before": ["leader", "w"],
    "commands": ["go-to-next-error.next.warning"]
  },
  {
    "before": ["leader", "W"],
    "commands": ["go-to-next-error.prev.warning"]
  }
]
#跳转至待办事项
利用 Todo Tree 中的 todo-tree.xxx 命令,我们可以方便的跳转至最近的待办事项
[
  {
    "before": ["leader", "t"],
    "commands": ["todo-tree.goToNext"]
  },
  {
    "before": ["leader", "T"],
    "commands": ["todo-tree.goToPrevious"]
  }
]
#跳转到上下文
打开或查看类型定义
[
  {
  // checkout type definition
    "before": ["g", "t"],
    "commands": ["editor.action.goToTypeDefinition"]
  },
  {
  // peek 类型
    "before": ["g", "p", "t"],
    "commands": ["editor.action.peekTypeDefinition"]
  }
]
打开或查看实现
[
  {
    "before": ["g", "i"],
    "commands": ["editor.action.goToImplementation"]
  },
  {
    "before": ["g", "p", "i"],
    "commands": ["editor.action.peekImplementation"]
  }
]
查看引用情况
[
  {
  // search reference
    "before": ["g", "r"],
    "commands": ["editor.action.referenceSearch.trigger"]
  }
]
#自动隐藏
vscode-autohide 是一个不错的自动隐藏插件,autohide 可以帮助你在编辑代码的过程中自动隐藏掉侧边栏、终端等无关面板。
在 vscode-autohide 的基础上, kevin-kwong.vscode-autohide-keyboard 添加了键盘事件支持和手动自动模式切换等功能
将 vscode-autohide-keyboard 设置成手动隐藏模式后,我们可以将 autoHide.runHide 命令与 VSCodeVim 快捷键捆绑起来,实现在特定时候隐藏掉面板。
例如在使用 h j k l 等命令移动光标时:
{
  "vim.normalModeKeyBindingsNonRecursive": [
    {
      "after": ["j"],
      "before": ["j"],
      "commands": ["autoHide.runHide"]
    },
    {
      "after": ["k"],
      "before": ["k"],
      "commands": ["autoHide.runHide"]
    },
    {
      "after": ["l"],
      "before": ["l"],
      "commands": ["autoHide.runHide"]
    },
    {
      "after": ["h"],
      "before": ["h"],
      "commands": ["autoHide.runHide"]
    }
  ]
}
#缩进
在 vim 中我们可以通过配置 .vimrc 文件,实现 vim 可视模式下的连续缩进
xnoremap > >gv
xnoremap < <gv
而在 VSCodeVim 中, .vimrc 的支持是实验性的,因此我在 settings.json 中配置了该功能
[
  {
    "before": [">"],
    "commands": ["editor.action.indentLines"]
  },
  {
    "before": ["<"],
    "commands": ["editor.action.outdentLines"]
  }
]
#折叠
VSCodeVim 毕竟是 Vim 模拟器,本质上你还是在使用 VSCode。如果你想操控光标经过一块折叠区,VSCodeVim 不会跳过折叠区域,反而让光标进入折叠内容。如果你讨厌这一点,可以配置 vim.foldfix 为 true,当然,这会引入一些副作用(详见 issue#22276),请谨慎考虑。
#选择
使用 smart-clicks 可以辅助光标更加快速地选中一些代码块,包括 html 标签、tailwindcss 工具类、JS 箭头函数等。虽然 smart-clicks 的主要功能在鼠标选中上,但其提供的命令对键盘操作同样有效。
// 扩大选择区
[
  {
    "before": ["a", "f"],
    "commands": ["editor.action.smartSelect.expand"]
  },
  // 缩小选择区
  {
    "before": ["a", "a"],
    "commands": ["editor.action.smartSelect.shrink"]
  }
]
#分词
如果你经常使用 TailwindCSS/UnoCSS 等 CSS 工具类库,修改分词符能够很好的提升编码效率
在分词之前
<div class="bg-slate"></div>
            ^光标
<!-- 执行 dw 删除单词后: -->
<div class="-slate"></div>
            ^光标
<div class="bg-slate"></div>
            ^光标
<!-- 执行 dw 删除单词后: -->
<div class=""></div>
            ^光标
VSCode 配置:
// settings.json
{
  "editor.wordSeparators": "`~!@#$%^&*()=+[{]}\\|;:'\",.<>/?" // 去掉了 '-' 号: TailwindCSS 和 UnoCSS 需要
}
#中文输入
im-select 是使用 Vim 时最常用的输入法切换工具,然而 im-select 虽然能够帮助自动切换输入法,但不能在同一个输入法中切换中英文和全角半角,因此我更加倾向于使用 im-select-imm(支持微软输入法)。
{
  "vim.autoSwitchInputMethod.defaultIM": "2053-0",
  "vim.autoSwitchInputMethod.enable": true,
  "vim.autoSwitchInputMethod.obtainIMCmd": "...path\\to\\im-select-imm.exe",
  "vim.autoSwitchInputMethod.switchIMCmd": "...path\\to\\im-select-imm.exe {im}"
}
#标记
取消高亮:
// delete all highlight
{
  "before": ["d", "a", "h"],
  "commands": [":nohl"]
}
删除所有标记
{
  "before": ["d", "a", "m"],
  "commands": [":delm!"]
}
查看所有标记
{
  "before": ["g", "m"],
  "commands": [":marks"]
}
#全局查找
虽然 VSCodeVim 提供了查找功能,但无法使用全局查找。通过 workbench.action.experimental.quickTextSearch 命令可以做到方便的使用全局查找,而不是使用 VSCode 图形界面。
{
  "before": ["leader", "f"],
  "commands": ["workbench.action.experimental.quickTextSearch"]
}
#全文选中
[
  {
    "before": ["<C-a>"],
    "after": ["g", "g", "V", "G"]
  }
]
#超链接
打开超链接:
// leader: open link with default browser
{
  "before": ["leader", "l"],
  "commands": ["editor.action.openLink"]
}
#编辑区之外
通过以下快捷键我们可以跳转到编辑区之外的面板:
#悬浮窗
gh 命令可以模拟鼠标悬浮效果,使用 gh 我们可以快速的查看一个变量的相关信息,有时悬浮窗信息过长可能需要滚动浏览。
// keybindings.json
[

  {
    "key": "h",
    "command": "editor.action.scrollLeftHover",
    "when": "editorHoverFocused"
  },
  {
    "key": "j",
    "command": "editor.action.scrollDownHover",
    "when": "editorHoverFocused"
  },
  {
    "key": "k",
    "command": "editor.action.scrollUpHover",
    "when": "editorHoverFocused"
  },
  {
    "key": "l",
    "command": "editor.action.scrollRightHover",
    "when": "editorHoverFocused"
  },
  {
    "key": "g g",
    "command": "editor.action.goToTopHover",
    "when": "editorHoverFocused"
  },
  {
    "key": "ctrl+up",
    "command": "-editor.action.goToTopHover",
    "when": "editorHoverFocused"
  },
  {
    "key": "shift+g",
    "command": "editor.action.goToBottomHover",
    "when": "editorHoverFocused"
  },
  {
    "key": "ctrl+down",
    "command": "-editor.action.goToBottomHover",
    "when": "editorHoverFocused"
  }
]
#文件
跳转到文件面板:ctrl + ,
// keybindings.json
{
  "command": "workbench.view.explorer",
  "key": "ctrl+oem_comma",
  "when": "viewContainer.workbench.view.explorer.enabled"
}
浏览文件区,以及新建文件、新建文件夹、重命名、删除、查找、在编辑区中打开、终端中打开和在文件浏览器中打开等操作
// keybindings.json
[

  {
    "command": "explorer.newFile",
    "key": "a",
    "when": "filesExplorerFocus && !inputFocus"
  },
  {
    "command": "filesExplorer.copy",
    "key": "y",
    "when": "filesExplorerFocus && !inputFocus"
  },
  {
    "command": "filesExplorer.paste",
    "key": "p",
    "when": "filesExplorerFocus && !inputFocus"
  },
  {
    "command": "filesExplorer.findInFolder",
    "key": "f",
    "when": "filesExplorerFocus && !inputFocus"
  },
  {
    "command": "renameFile",
    "key": "r",
    "when": "explorerViewletVisible && filesExplorerFocus && !explorerResourceReadonly && !inputFocus && !inputValidation"
  },
  {
    "key": "t",
    "command": "openInIntegratedTerminal",
    "when": "filesExplorerFocus && !inputFocus"
  },
  {
    "command": "explorer.newFolder",
    "key": "shift+a",
    "when": "filesExplorerFocus && !inputFocus"
  },
  {
    "command": "deleteFile",
    "key": "d",
    "when": "explorerViewletVisible && filesExplorerFocus && !explorerResourceReadonly && !inputFocus"
  }
]
#终端
跳转到终端:使用 VSCode 默认按键
Alacritty 是一款非常好用的终端应用,Alacritty 内置了 Vi Mode 以快速浏览和选中终端信息,虽然 VSCode 内置终端无法实现这一点,但是我们可以使用 vscode-terminal-capture 生成一个临时快照文件,并在编辑区浏览终端信息。
{
  "key": "ctrl+t c",
  "command": "extension.terminalCapture.runCapture",
  "when": "terminalFocus"
}
kill 终端、重命名终端、终端面板最大化:
// keybindings.json
[
  {
    "key": "ctrl+t d",
    "command": "workbench.action.terminal.kill"
  },
  {
    "key": "shift+alt+r",
    "command": "-revealFileInOS",
    "when": "!editorFocus"
  },
  {
    "key": "ctrl+r",
    "command": "workbench.action.terminal.renameActiveTab",
    "when": "terminalHasBeenCreated && terminalTabsFocus && terminalTabsSingularSelection || terminalProcessSupported && terminalTabsFocus && terminalTabsSingularSelection"
  },
  {
    "key": "f2",
    "command": "-workbench.action.terminal.renameActiveTab",
    "when": "terminalHasBeenCreated && terminalTabsFocus && terminalTabsSingularSelection || terminalProcessSupported && terminalTabsFocus && terminalTabsSingularSelection"
  },
  {
    "key": "ctrl+m",
    "command": "workbench.action.toggleMaximizedPanel",
    "when": "terminalFocus && !filesExplorerFocus && !editorFocus"
  }
]
#标签页
操作已打开的标签页:
// keybindings.json
[
  {
    "command": "workbench.action.nextEditor",
    "key": "ctrl+l"
  },
  {
    "command": "workbench.action.previousEditor",
    "key": "ctrl+h"
  },
  {
    "command": "workbench.action.closeActiveEditor",
    "key": "ctrl+oem_7"
  },
  {
    "command": "-workbench.action.closeActiveEditor",
    "key": "ctrl+w"
  },
  {
    "key": "ctrl+shift+oem_7",
    "command": "workbench.action.closeOtherEditors"
  }
]
固定标签页:
// settings.json vim
// leader: pin/unpin edit
[
  {
    "before": ["leader", "p"],
    "commands": [
      "workbench.action.pinEditor"
    ]
  },
  {
    "before": ["leader", "P"],
    "commands": [
      "workbench.action.unpinEditor"
    ]
  }
]
移动标签页:
[
  {
    "key": "alt+h",
    "command": "workbench.action.moveEditorLeftInGroup"
  },
  {
    "key": "ctrl+shift+pageup",
    "command": "-workbench.action.moveEditorLeftInGroup"
  },
  {
    "key": "alt+l",
    "command": "workbench.action.moveEditorRightInGroup"
  },
  {
    "key": "ctrl+shift+pagedown",
    "command": "-workbench.action.moveEditorRightInGroup"
  }
]
#Git
对比文件变化:
// leader: open git change
{
  "before": ["leader", "c"],
  "commands": ["git.openChange"]
}
打开 git-graph(需要安装 mhutchie.git-graph 插件):
{
  "before": [
    "leader",
    "g"
  ],
  "commands": [
    "git-graph.view"
  ]
}